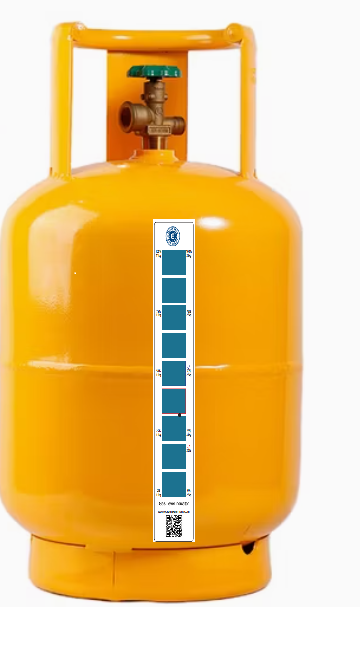
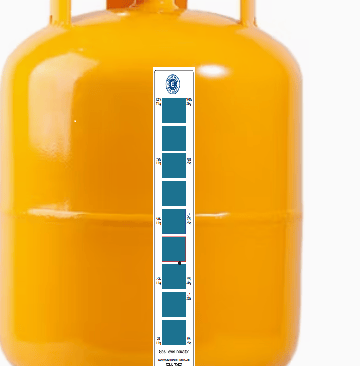
Gas Level Indicator
✅ “Save gas. Know your level instantly.”
✅ “No guessing — see your cylinder’s level in seconds.”
✅ “Smart home safety starts here.”

User Manual
Provide a short description of categories listed below.
📖 Instructions – How to Apply the LPG Gas Level Indicator
1. Preparation
Make sure the gas cylinder is outside in a well-ventilated area.
Identify a smooth, clean surface on the cylinder wall (avoid weld seams, logos, or embossed text).
Clean the surface with Glass cleaner Spray or soap water to remove dirt, grease, or oil.
Dry completely before applying.
2. Placement Location
The sticker must be applied vertically on the side wall of the cylinder.
Do not apply near the top dome or bottom curved edge.
Always keep the sticker on the straight wall section.
Position by Cylinder Size:
11 kg cylinder (≈48 cm tall):
➝ Place the bottom of the sticker about 6 cm above the base ring.
➝ Sticker height should cover ≈23–25 cm upward.
22 kg cylinder (≈75 cm tall):
➝ Place the bottom of the sticker about 9 cm above the base ring.
➝ Sticker height should cover ≈23–25 cm upward.
3. Application Steps
Remove the adhesive backing (or align magnetic type).
Place the bottom edge of the sticker at the correct height (6 cm or 9 cm above the base).
Press vertically upward, smoothing to avoid air bubbles.
Ensure the sticker is straight for accurate measurement.
4. How to Read
How to Read the Gas Level Sticker
Turn on the gas and keep the burner running for 60–90 seconds.
Look at the sticker:
Darker color = liquid LPG (filled part).
Lighter color = gas/vapor (empty part).
The line between them shows your current gas level.
5. Important Notes
Suitable for 11 kg & 22 kg LPG cylinders.
Works with magnetic or adhesive installation.
For external measurement only – no need to remove cylinder fittings.
Store the cylinder and sticker away from flames,
📖 تعليمات – كيفية استخدام ملصق مؤشر مستوى غاز البترول المسال
(LPG)
١. التحضير
تأكد من أن أسطوانة الغاز موجودة في مكان مفتوح وجيد التهوية.
اختر سطحاً أملساً ونظيفاً على جدار الأسطوانة (تجنب اللحامات أو الشعارات أو الكتابات البارزة).
نظّف السطح باستخدام بخاخ منظف الزجاج أو ماء وصابون لإزالة الأتربة أو الزيوت أو الشحوم.
جفف السطح تماماً قبل تركيب الملصق.
٢. مكان التركيب
يجب تركيب الملصق بشكل عمودي على جانب الأسطوانة.
لا تضع الملصق بالقرب من الجزء العلوي (القبة) أو الجزء السفلي المنحني.
يجب أن يكون الملصق على الجزء المستقيم من جدار الأسطوانة.
تحديد الموضع حسب حجم الأسطوانة:
أسطوانة ١١ كجم (ارتفاعها تقريباً ٤٨ سم):
➝ ضع أسفل الملصق على بعد حوالي ٦ سم فوق قاعدة الأسطوانة.
➝ يجب أن يغطي الملصق ارتفاعاً يقارب ٢٣ إلى ٢٥ سم للأعلى.
أسطوانة ٢٢ كجم (ارتفاعها تقريباً ٧٥ سم):
➝ ضع أسفل الملصق على بعد حوالي ٩ سم فوق قاعدة الأسطوانة.
➝ يجب أن يغطي الملصق ارتفاعاً يقارب ٢٣ إلى ٢٥ سم للأعلى.
٣. خطوات التركيب
أزل الغطاء اللاصق (أو ضع الملصق المغناطيسي في مكانه مباشرة).
ضع الحافة السفلية للملصق على الارتفاع المحدد (٦ سم أو ٩ سم فوق القاعدة).
اضغط للأعلى بشكل عمودي مع إزالة الفقاعات الهوائية أثناء التركيب.
تأكد من أن الملصق مستقيم لضمان قراءة دقيقة.
٤. طريقة القراءة
كيفية قراءة مؤشر مستوى الغاز:
افتح الغاز وشغّل الموقد لمدة ٦٠ إلى ٩٠ ثانية.
لاحظ التغيّر على الملصق:
🔸 اللون الداكن = الغاز السائل (الجزء المملوء).
🔸 اللون الفاتح = غاز أو بخار (الجزء الفارغ).
الخط الفاصل بين اللونين يوضح مستوى الغاز الحالي في الأسطوانة.
٥. ملاحظات هامة
مناسب لأسطوانات غاز البترول المسال ١١ كجم و٢٢ كجم.
يعمل مع الملصقات اللاصقة أو المغناطيسية.
للقياس الخارجي فقط – لا حاجة لفك أي توصيلات من الأسطوانة.
يُحفظ بعيداً عن اللهب المباشر أو الحرارة العالية.